Short description of the article
Intro
Adding routing to the application
Changing data types and the service to work with them
Getting the parameters from routing
Conclusion
Intro
In the previous article, we created a simple Angular application to display the weather forecast. We created two components - the weather component and the weather-details component. We received weather data from the mock file and provided it through the service to the weather component, and further into the weather-details component of each city. Then, by clicking on one of the cities we displayed corresponding weather-details component.
Finally, our application looked like this:
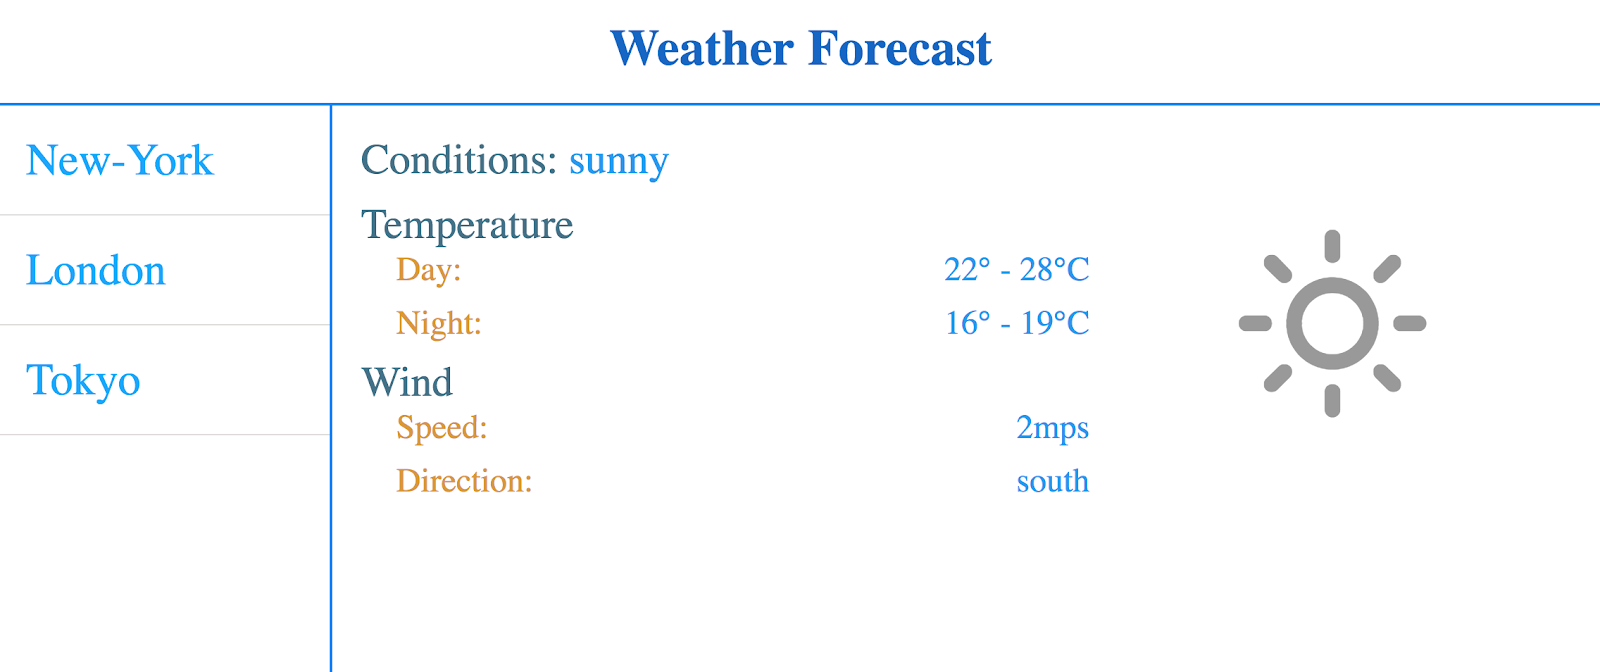
It can be assumed that we are not satisfied with this application template. Now we want to have the list of cities and weather forecast inside different blocks of the page. Let's go further: suppose that our application will continue to evolve, and other functions will appear beside the weather forecast - for example, displaying of news, exchanging rates, etc. The most intuitive interface, in this case, will be a classic layout with a sidebar containing links on the left side and the main content on the right side. The sidebar will always be present on the screen and only the part with the main content will change.
Adding routing to the application

So we have got close to the use of routing in Angular. And the layout described above in single-page applications is realized with its help.
First, let's imagine the new structure of our application:

We have modify the layout of the weather component and remove template binding to the weather-details component. Instead, we will create a routing node using Angular features.
...
   <div class="page-body__details">
     <!--Router will be here soon-->
   </div>
...
So, let's start reorganizing our application using Angular routing. The best practice is to create separate modules for routing functionality.
The first thing to do in the root component template is to specify the location where the corresponding components will be rendered when navigating to the particular route.
Angular provides a special tag to do this - `router-outlet`. In our case, the root component template will look like this:
<router-outlet></router-outlet>
The best practice is to create separate modules for routing functionality. Therefore, we will create a root routing module - an app-routing.module.
import { NgModule } from '@angular/core';
import { RouterModule, Routes } from '@angular/router';

const appRoutes: Routes = [
 { path: 'weather', loadChildren: './weather/weather.module#WeatherModule' },
 { path: '', redirectTo: 'weather', pathMatch: 'full' }
];

@NgModule({
 imports: [ RouterModule.forRoot(appRoutes) ],
 exports: [ RouterModule ]
})
export class AppRoutingModule { }
Here we defined the constant appRoutes, which is an array of routes that describes the routing scheme relative to the application root. Namely, we will have one "weather" route, according to which the weather component will be rendered in place of the router-outlet component. We also determined that when you go to an empty route, you will be redirected to the "weather" route.
Note: here we use the feature of Angular routing - lazy-loading modules. This technology allows the builder (Webpack, etc.) to allocate lazy loadable modules with separate files, which are downloaded by the browser only in case of switching over the corresponding routing.
Next, we import the Router Module and configure it, passing our array with routes to its "forRoot" method. Finally, we export the configured Router Module.
Now modify the root module of the application:
import { BrowserModule } from '@angular/platform-browser';
import { NgModule } from '@angular/core';

import { AppComponent } from './app.component';
import { AppRoutingModule } from './app-routing.module';

@NgModule({
 declarations: [ AppComponent ],
 imports: [
   BrowserModule,
   AppRoutingModule
 ],
 providers: [],
 bootstrap: [ AppComponent ]
})
export class AppModule { }
As you can see, we no longer import and declare the weather and weather-details components in the app module. Instead, we import app-routing module. It should be mentioned that the weather and weather-details components will be declared in their own modules, that we will create later.
Note: do not forget to delete weather and weather-details components declaration in app module.
The mechanism of lazy loading modules by its definition involves loading the module, which declares the corresponding component. In addition, if a module is a routing node, it must have its own routing module. Next, we will create weather and weather-routing modules:
import { NgModule } from '@angular/core';
import { RouterModule, Routes } from '@angular/router';

import { WeatherComponent } from './weather.component';

const weatherRoutes: Routes = [
 { path: '', component: WeatherComponent }
];

@NgModule({
 imports: [ RouterModule.forChild(weatherRoutes) ],
 exports: [ RouterModule ]
})
export class WeatherRoutingModule { }
import { NgModule } from '@angular/core';
import { CommonModule } from '@angular/common';

import { WeatherComponent } from './weather.component';
import { WeatherRoutingModule } from './weather-routing.module';

@NgModule({
 declarations: [ WeatherComponent ],
 imports: [
   CommonModule,
   WeatherRoutingModule
 ]
})
export class WeatherModule { }
In the same way, as we did earlier, we create a routing configuration for the weather node and store it in the weatherRoutes array. We import the Router Module again and configure it, but using "forChild" method, since our node is not the root.
Weather module was indicated as a lazy-loadable module above. So it is loaded when the user is going to the “weather” route. Here we declared the weather component, imported the routing module and the common module necessary for using a number of Angular common directives (such as ngIf, ngFor, ngClass, etc.) in the component template.
If everything was done correctly, after compilation, we will not see any changes in the appearance of our application, as in fact we just changed its architecture.
It would be logical to assume that when clicking on one of the cities we should go to the "weather/detail/
So, let's add the router-outlet to the place where the forecast will be rendered.
...
<div class="page-body__details">
 <router-outlet></router-outlet>
</div>
...
Next, create a module for the weather-details component, as well as the routing module for it.
import { NgModule } from '@angular/core';
import { RouterModule, Routes } from '@angular/router';

import { WeatherDetailsComponent } from './weather-details.component';

const weatherDetailsRoutes: Routes = [
 { path: '', component: WeatherDetailsComponent }
];

@NgModule({
 imports: [ RouterModule.forChild(weatherDetailsRoutes) ],
 exports: [ RouterModule ]
})
export class WeatherDetailsRoutingModule { }
import { NgModule } from '@angular/core';
import { CommonModule } from '@angular/common';

import { WeatherDetailsComponent } from './weather-details.component';
import { WeatherDetailsRoutingModule } from './weather-details-routing.module';

@NgModule({
 declarations: [ WeatherDetailsComponent ],
 imports: [
   CommonModule,
   WeatherDetailsRoutingModule
 ]
})
export class WeatherDetailsModule { }
Similarly, with the weather component, we prepared the weather-details component for inclusion in our routing system, as a lazily-loaded module. Earlier we dealt with the child components, and now we will analyze the notion of child routes. Since the weather-details component remains in the application hierarchy as a child relative to the weather component, we will represent the route for it as a child to the "weather" route.
To do this, we change the configuration of the weather component routing.
const weatherRoutes: Routes = [
 { path: '',
   component: WeatherComponent,
   children: [
     { path: 'details/:id', loadChildren: './weather-details/weather-details.module#WeatherDetailsModule' }
   ]
 }
];
As you can see, we added a child route to the already existing "weather" route. Also, in the configuration of the routing, we indicated the mandatory parameter of the city ID. As a result, for the output of the forecast, we need to go to the URL like "weather/details/2".
Changing data types and the service to work with them

Go to the weather-details component. At the moment, it involves retrieving from the parent component an object with a weather forecast to display it. Now we will go the other way: the weather-details component will get the city ID from the URL and a forecast from the data service upon request.
First of all, change our data types City and Forecast:
city.ts
export interface City {
 id: number;
 name: string;
}
forecast.ts
export interface Forecast {
 cityId: number;
 conditions: string;
 wind: {
   speed: number;
   direction: string;
 };
 temperature: {
   day: {
     min: number;
     max: number;
   },
   night: {
     min: number;
     max: number;
   }
 };
}
Next, we rewrite the mocks to match the new data types:
cities.mock.ts
import { City } from '../core/interfaces/city';

export const CITIES: Array<City> = [
 {
   id: 0,
   name: 'New-York'
 },
 {
   id: 1,
   name: 'London'
 },
 {
   id: 2,
   name: 'Tokyo'
 }
];
forecasts.mock.ts
import { Forecast } from '../core/interfaces/forecast';

export const FORECASTS: Array<Forecast> = [
   {
       cityId: 0,
       conditions: 'cloudy',
       wind: {
           speed: 6,
           direction: 'north-west'
       },
       temperature: {
           day: {
               min: 14,
               max: 18
           },
           night: {
               min: 5,
               max: 8
           }
       }
   },
   {
       cityId: 1,
       conditions: 'rain',
       wind: {
           speed: 3,
           direction: 'east'
       },
       temperature: {
           day: {
               min: 11,
               max: 14
           },
           night: {
               min: 3,
               max: 7
           }
       }
   },
   {
       cityId: 2,
       conditions: 'sunny',
       wind: {
           speed: 2,
           direction: 'south'
       },
       temperature: {
           day: {
               min: 22,
               max: 28
           },
           night: {
               min: 16,
               max: 19
           }
       }
   }
];
Since the "getCities" method of the data service now returns a list of cities without weather forecasts, we add the method for obtaining the forecast for the city ID to it:
city.service.ts
import { Injectable } from '@angular/core';

import { City } from '../interfaces/city';
import { Forecast } from '../interfaces/forecast';
import { CITIES } from '../../mocks/cities.mock';
import { FORECASTS } from '../../mocks/forecasts.mock';

@Injectable({
 providedIn: 'root'
})
export class CityService {

 getCities(): Array<City> {
   return CITIES;
 }

 getForecast(cityId: number): Forecast {
   return FORECASTS.find(forecast => forecast.cityId === cityId);
 }

}
Getting the parameters from routing

The essence of the method is that we are looking for an element in the "FORECASTS" array whose "cityId" field matches the city ID passed to the method as a parameter.
So, reorganize the weather-details component to get the forecast with the ID parameter from the router.
import { Component, OnInit } from '@angular/core';
import { ActivatedRoute } from '@angular/router';

import { Forecast } from '../../core/interfaces/forecast';
import { CityService } from '../../core/services/city.service';

@Component({
 selector: 'app-weather-details',
 templateUrl: './weather-details.component.html',
 styleUrls: ['./weather-details.component.scss']
})
export class WeatherDetailsComponent implements OnInit {

 forecast: Forecast;

 constructor(
   private route: ActivatedRoute,
   private cityService: CityService
 ) { }

ngOnInit() {
 this.route.params.subscribe(params => this.initializeForecast(+params.id));
}

initializeForecast(id: number) {
 this.forecast = this.cityService.getForecast(id);
}
Here we import the ActivatedRoute and implement it into the component using the dependency injection mechanism discussed in the previous article. Now with the help of the "route" variable, we can get the object with the variables that were passed by routing.
To do this, we use the object "params" which has the type "Behavior Subject". This is one of the observable data types provided by the RxJs library. Working with the methods of this library cannot be considered within one article, so we will limit it to using it only to receive the parameters from the routing.
As you can see from the code, to get the city ID from the routing we used the "subscribe" method, which allows us to subscribe to the data change in the observed source, and in case of such a change, to call the callback function with the routing parameter passed as argument. In our case, as a function, we call the "initializeForecast" method and pass the received ID to it. Knowing the city's ID, we can use the "getForecast" method of the city.service to get the object with the weather forecast.
The best way to do it is when the component is initialized, in the ngOnInit method. Since in the specification of the "getForecast" method we specified the type of the received parameter as "number", when the initializeForecast method is called, we convert the ID received from the routing from a string to a number. As a result, in the variable "forecast" we will get the object of the type "Forecast" for the selected city.
The next task to perform will be the modification of the weather component in order to change the route by clicking on a certain city. To do this, first of all, we modify the weather component class, since at the moment most of the functions implemented in it are no longer required.
import { Component, OnInit } from '@angular/core';

import { City } from '../core/interfaces/city';
import { CityService } from '../core/services/city.service';

@Component({
 selector: 'app-weather',
 templateUrl: './weather.component.html',
 styleUrls: ['./weather.component.scss']
})
export class WeatherComponent implements OnInit {

 cities: Array<City> = [];

 constructor(private cityService: CityService) { }

 ngOnInit() {
   this.cities = this.cityService.getCities();
 }

}
We removed the method of processing the click on the city name and now here it is implemented only obtaining a list of all cities in the initialization phase of the component.
The weather component template was also changed:
<div class="page">
 <div class="page-header">Weather Forecast</div>
 <div class="page-body">
   <div class="page-body__sidebar">
     <ul class="cities-list">
       <li class="cities-list__item" *ngFor="let city of cities">
           <a [routerLink]="['details', city.id]">{{ city.name }}</a>
       </li>
     </ul>
   </div>
   <div class="page-body__details">
     <router-outlet></router-outlet>
   </div>
 </div>
</div>
Let's briefly describe what we did.
Firstly, we converted the city name in the list into a link.
Secondly, instead of using the "href" attribute, we applied the "routerLink" directive to it, which is responsible for switching to routes and passing parameters with their help.
In our case, since we have determined that the "details" route assumes the transfer of the parameter (id), we will give an array of two elements: a string with the name of the route and a parameter (the ID of the selected city).
Also, read our article about Part 1 for this Guide: Creating Basic Angular Application in 10 minutes - Part 1.
Conclusion
As a result, when you click on one of the cities, you will go to the route "details" with the city ID as the parameter. When moving to a route, you can see the rendering of the weather-details component template after the router-outlet of the weather component template.
During the initialization phase of the weather-details component, we subscribe to the parameters that are passing using router. As soon as the change parameter event occurs (formally - moving to the router with any parameter), a query is made to the data service to receive the object with the weather forecast. When such an object is obtained, it is assigned to the component variable "forecast" from which it is already directly displayed in the template.
In case, you have any questions or suggestions, feel free to contact us!


