Let’s imagine, you have developed an app and you are ready to launch it. Now it's time to introduce it to the audience and publish your app on App Store or Google Play. What are the steps involved in submitting an app to the stores? What’s behind the final result?
Google Play and App Store are the two largest platforms for distributing and promoting apps. Each platform comes with its own set of rules, regulations, and procedures that should be met. Otherwise, application may be rejected.
Publishing an app on Google Play and App Store may be challenging. However, if you understand how it works, it is not that hard. We have prepared a guide for those who are planning to publish their apps on these stores. Let's start.
Publishing an App on App Store
Adding a mobile app to the App Store is not an easy task. How to publish app on the App Store? Apple has strict requirements for the apps being uploaded. Before your app appears in the store, it should go through an app certification process. The certification process is carried out by the review team, they technically check and then approve the app in case it conforms to App Store Guidelines.
So, the first thing you should do before launching an iOS app is to thoroughly read the App Store Review Guidelines to get through the review process quickly. In addition to following the guidelines, you must ensure that your application is free of bugs and crashes. Here are the steps to publish an iOS app on App Store:
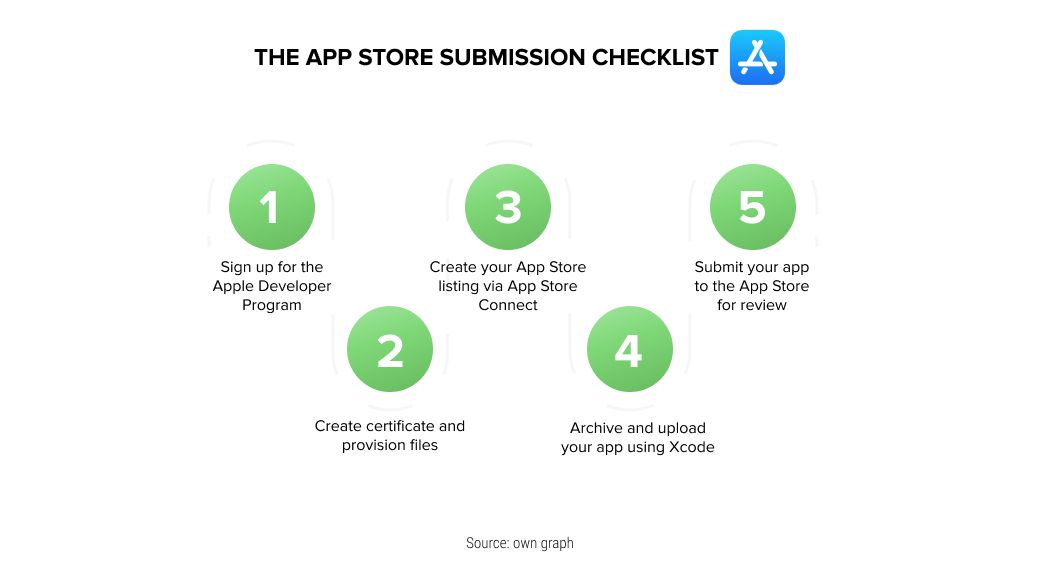
1. Getting started
The first step on the path to the App Store is to register as an Apple developer. To be able to upload apps to the store, you’ll also need to be enrolled in the App Developer Program and to pay an annual fee of $99. Apple Developer Program allows distributing an application to customers all over the world and gives you access to:
Submit apps to the App Stores on all Apple platforms;
Get the latest Beta versions;
Use advanced app features;
Test your app in TestFlight;
Use analytics.
Additionally, you’ll need Xcode, the apple development software. Xcode is an Integrated Development Environment (IDE) for Apple operating systems where developers can build and edit applications to their final release to the App Store.
2. Code signing: Distribution provisioning profile and distribution certificate
The apps should be signed with a certificate issued by Apple before being installed on a device or being uploaded to the App Store. If your application does not have such a certificate, it will be rejected. Code signing makes the apps secure for users and makes sure that the application has not been changed since it was last signed.
You will need a separate provisioning profile and a distribution certificate to distribute the app to users on the App Store. In most cases, Xcode is the preferred method to do this. If automatic signing is enabled, Xcode will create certificates for iOS and macOS, sign IDs and handle device registration for you.
3. Create an App Store Connect record
The application is released via App Store Connect – Apple's service for publishing, updating and managing your apps on the App Store. This is where you can register a new app, enter the app’s details including description and screenshots.
So, if you are the Account Holder, sign in to the App Store Connect account with your Apple ID you used to join the Apple Developer Program. You can also be invited by an existing organization as a user.
To create an app record in your App Store Connect account, you’ll need to fill in the following details: platform, app name, default language, bundle ID, and SKU.
4. Input your app details
When submitting an application, you should clearly communicate its purpose identifying app details correctly. To submit the app for review you need to provide all the necessary metadata:
App name;
Description;
App icon which is optimized for different devices;
Screenshots;
Categories;
Rating;
Keywords for App Store Optimization;
Video preview (optional);
Support URL;
Copyright information.
5. Prepare for submission
Everything seems to be ready to be sent for review. But there is still something to be done. Before you can submit your app for review via App Store Connect, you need to upload the build using Xcode. Once completed and your upload is accepted, your app is halfway to the App Store.
6. Submit your app for review
You’re almost done. Switch back to App Store Connect and scroll down to the Build area and click Select a build before you submit your app. Choose the build Xcode and click Done and then Submit for Review. If you have done everything correctly, your app’s status will change to Waiting For Review.
You just have to wait now. Usually it takes about several days to review your app, but review time may vary depending on the app. On average, 50% of apps are reviewed in 24 hours and over 90% are reviewed in 48 hours.
Common Reasons for Rejection by the Apple Review Board
In case your app gets rejected, you need to review the guidelines provided by Apple and make all the necessary adjustments. Below are common reasons why the application may be rejected and what to look for to improve your app's chances of being accepted the first time.
The following list contains the most popular reasons for an app to be rejected:
Crashes and bugs – An app is incomplete. Test your app on devices running the latest software and fix any bugs before submitting.
Broken links – All links in your app should function well. Otherwise, it can increase the chance of rejection. Take time and go through the mobile app and test every link.
Inaccurate screenshots – Screenshots should clearly show the value and functionality of your application.
Repeated submission – Submitting multiple applications that are essentially the same increases the risk of getting rejected.
Poor UI – The app should meet Apple’s design requirements. In order to build clean interfaces follow UI Design Dos and Don’ts.
Incomplete information – If the information you provided is incomplete or out-of-date, Apple might reject your app.
Misleading users – If your app describes itself as something that it is not, you won’t get approval from Apple.
All of the above points are the common reasons why the Apple Review Board may reject the application submission. If the app does not meet Apple's requirements, reviewers will return it to the developers with a request to fix the errors. They usually indicate the reason for the reject, so developers can fix it and send the application for a second review.
If everything is ok and your app complies with the rules, it will be approved and you’ll get an email about it. Congratulations! Your app is now on the App Store!
Publishing an App on Google Play
How to submit an app to Google Play? Just like the App Store, Google Play comes with its own set of guidelines and procedures. And it is essential to understand how it works to publish an app without any issues. In order to submit your app to the Google Play store, it is mandatory to create a Google Publisher Account. The registration fee is a one-time payment of $25.
Similarly, you will be required to provide the app information and graphic assets, including app icons, screenshots, and description. But first things first. Here are the steps to publish an Android app on Google Play:
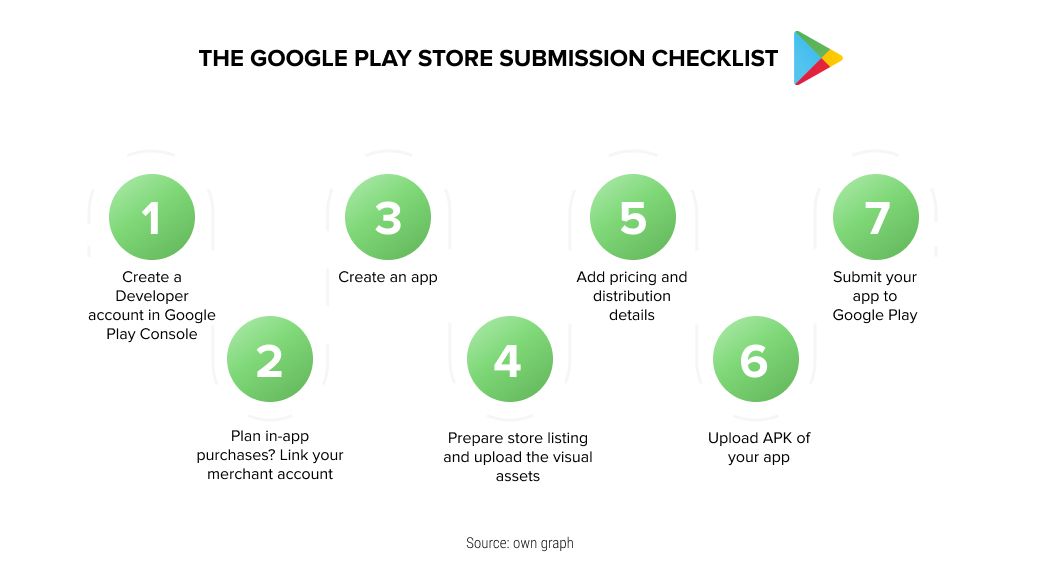
1. Create a developer account
It is essential to have a developer account in a Google Play Console. Developers can sign up using their existing Google Account. As we have already mentioned, you’ll need to pay a one-time registration fee of $25.
2. Link the merchant account
If you are planning in-app purchases, you should create a merchant profile. Once created, the profile is automatically attached to the developer account. Merchant account makes it easier to manage the sales along with monthly payments.
3. Create your app
Once you've set up the Google Play console, it's time to create the app on Play Console. At this point, you will need to specify your application name and select a default language.
4. Prepare Google Play App Store listing
Before you can upload your app, you need to prepare its store listing. There are the details that will be shown to users on your app’s listing on Google Play. Take this step responsibly and fill in the information correctly.
The information required for your store listing is divided into several categories:
Product details – title, short description, full description.
Graphic assets – screenshots, images, videos, promotional graphics, icons. Your app store's listing visuals play a huge role in user acquisition. Graphic materials should be both informative and attract user’s attention. It should be noted that some assets are mandatory, while others optional.
Languages and translations – if the application is distributed for several countries, you can provide localization of your app information.
Categorization – it includes the type of application and the category to which it belongs. Choose the one that suits your application.
Contact details – enter contact information details to help users get support regarding your app.
Privacy policy – it is especially important for applications that request access to user permissions and data. Privacy policy should disclose how your app collects, uses and shares data.
5. Sign your app
The app should be digitally signed with a certificate. Google Play needs this signature to identify the developer. If you are using Android App Bundles, you only need to sign your app bundle before uploading it to the Google Play Console. Starting August 2021, new apps will be required to publish with the Android App Bundle on Google Play.
6. Upload APK to an App Release
Once you are done with the store listing, you will need to upload the APK file to the Play Store. APK (stands for the Android Package Kit) is a file format used by the Android operating system to distribute and install applications.
You will be asked to choose the type of release – Beta or Alpha – if you want testing your app. If your app is ready to be sent, move to the production page. Here you can actually upload the files. Before sending your app, you will need to fill out a content rating questionnaire, as well as finalize pricing and distribution plans for the app.
7. Publish an app
After you’ve completed all the steps, the app is ready to be reviewed by Google. Before review and rollout release, make sure your app complies with Google guidelines. If everything is right and you have taken care of all the details, wait for the news that your app has been approved and successfully published on the Google Play Store.
Common Reasons for Rejection by Google
What to do if your Android app was rejected? Let's consider the common issues in order to understand why this may happen. So, why Google rejects apps?
The app has restricted content;
The app misleads users by impersonating someone else;
The app violates intellectual property;
The app neglects privacy and security;
The app has deceptive or disruptive ads;
The app doesn’t comply with the Children’s Online Privacy Protection Act (COPPA);
The app spams users with unsolicited messages and doesn’t provide a stable user experience.
Therefore, before submitting an app, developers should consider a number of issues to ensure that it is compliant with Google's protocols.
Final Thoughts
Publishing an app for the first time on the Apple App Store and Google Play Store is both exciting and challenging. We hope these guides provide you with a better understanding of what goes behind the process of publishing an app to the stores.
Drop us a line if you have any questions and we'll gladly help you with any inquiry.


