
Let’s start with React Native testing. 😌 I’m not going to talk about splitting up the code into separate modules and start to write tests before the app grows, so covering it by test becomes a real pain. These are way too obvious things. What I'd like to do instead, is simply show you an example of how you can start with unit testing. So after that, you can follow the strategy below or build your own.
Check out the video tutorial with the step-by-step guidelines from one of our devs.
As for me, the project structure plays a really important role because it sets you in the right way. So before writing tests I’d like to stop for a moment and consider a few options on how you can structure the folders. Precisely, where you can place the test files. You can choose different approaches but the most «popular» are:
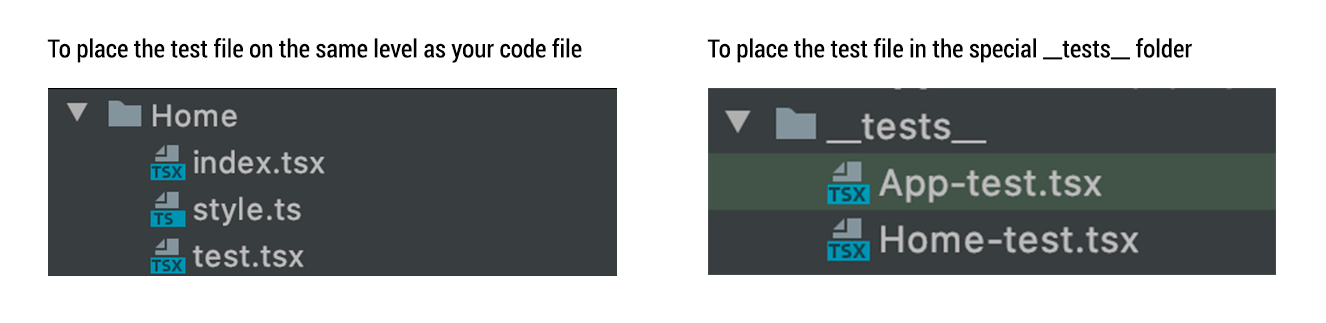
I especially like the second approach. Nevertheless, you can stick to the one that suits you best or come up with your own way of structuring the folders.
🤓 Set Up Our First Test
So let’s create a simple React Native app for delivering different advice to the user. Let’s name it AdviceApp and cover it by unit tests! As I’m using Typescript with React Native, the command will be following:
npx react-native init AdviceApp --template react-native-template-typescript
And I highly recommend you to come to the Typescript side 💥 because, among many other advantages, I’m fond of readability, early spotted bugs, and especially optional chaining. Getting back to our just created app. Run `react-native run-ios` and the simulator with the app will appear on your screen. You can make sure that everything is working. As we have Jest, react-test-renderer and _tests_ folder with the first test for App.tsx out-of-the-box in React Native, so now we can run `npm test` to try it out. We’ll see the following result:
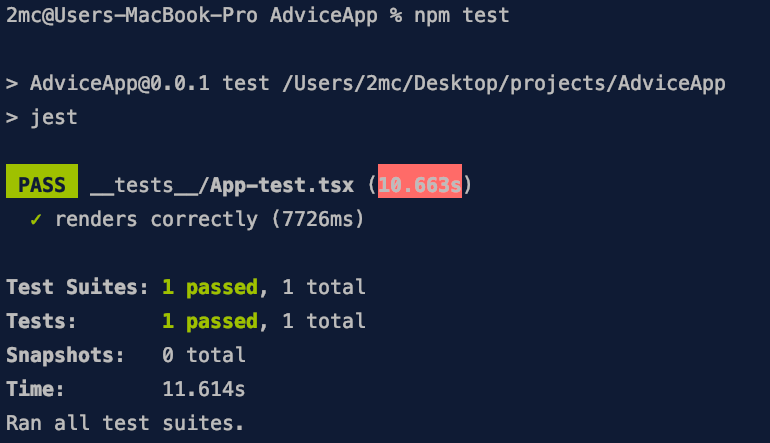
Since we did not change anything yet, it says that everything works correctly. So we are starting to expand the app. And I don’t want to focus on the process of creating the app because the article is not about that but you can take a look at it in our repo. I only want to admit that I do not adhere to the usual structure of folders and files placement in order to make everything as simple as possible. For now, I’ll show how our app looks and works.
Firstly we have only one component which has a `Home` name and we need to write a test for it. And as we already have react-test-renderer let’s write a similar test for our App.
import 'react-native';
import React from 'react';
import renderer from 'react-test-renderer';

import Home from '../src/components/Home';

it('renders correctly', () => {
 renderer.create(<Home />);
});
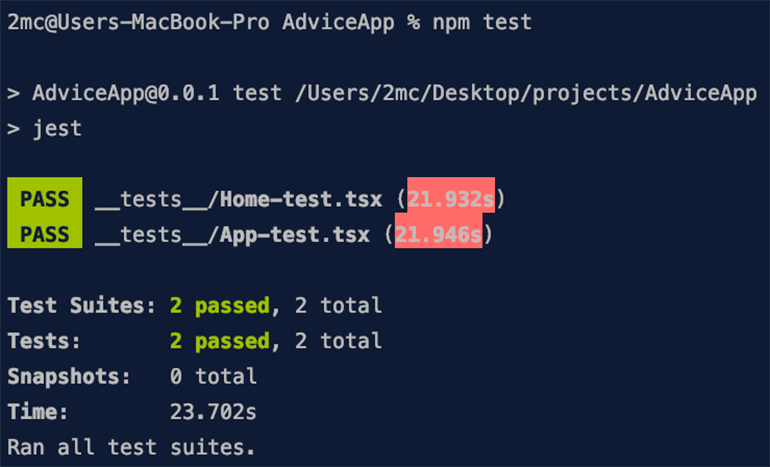
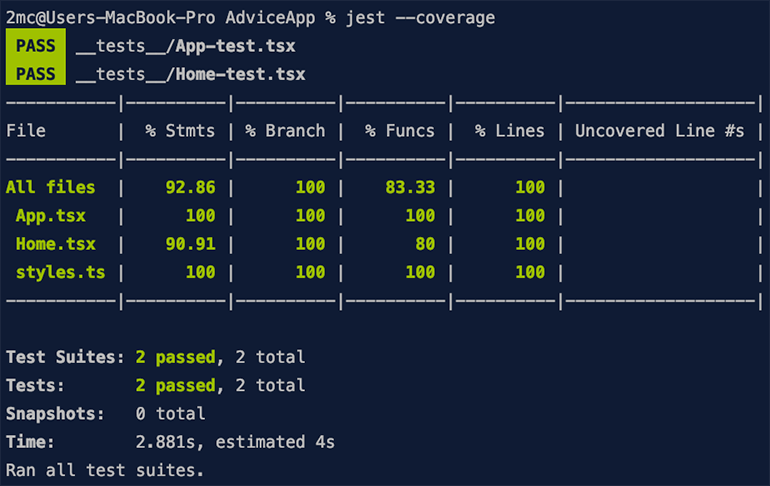
It looks so simple! Let’s run `npm test`. The output shows that we successfully passed 2 tests: both for App and Home. WOW!
🤔 What is Code Coverage and How do you Measure it?
It's worth mentioning that there is such a thing as code coverage which has the same meaning as test coverage. Both notions can be explained as showing how much of your code is covered by the unit tests and what is more important which part of the code is successfully passed after execution.
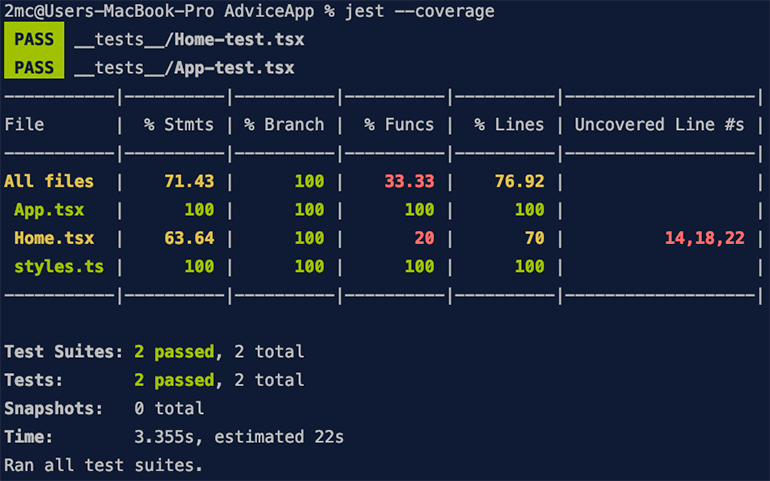
Code coverage (or test coverage) is usually measured in percentages. To implement code coverage we need to run `jest —coverage`. As a result, we see that we cover only 71.43% of our app which is not a very good quality indicator of test coverage. The indicator of 80 percent is considered to be the norm, but of course the higher coverage percentage the better.
Fortunately, code coverage shows where exactly the coverage is missing. It even shows the number of code lines that are not covered! In our case coverage is missing in the `Home` component on lines 14, 18 and 22.
💪🏻 Improving our Code Coverage Indicators with React-Native-Testing-Library
So let’s continue to cover our app by tests to increase the code coverage indicator. For improving those indicators let’s add react-native-testing-library. React-native-testing-library is highly inspired by react-testing-library which is known as one of the best libraries to test React apps. Plus, it provides some utility functions on the top of react-test-render. It also has great compatibility with Jest. For installing react-native-testing-library we run the following command: `npm i react-native-testing-library -D`
After successful package installation, we need to rework Home-test.tsx with react-native-testing-library. This is what it looks like now:
import 'react-native';
import React from 'react';
import {render, fireEvent} from 'react-native-testing-library';

import Home from '../src/components/Home';

describe('Home', () => {
 describe('clicking Get another device!', () => {
   it('renders new advice', () => {
     const {getByText} = render(<Home />);

     fireEvent.press(getByText('Get another advice!'));
   });
 });
});
We run test - and it passed. As a result, we improved test coverage up to 92.86%!
Although it is much better now and can be considered the norm, we’re going to improve it even more! As I mentioned in the beginning, splitting up the code is very important. So we are going to take our API call into a separate file. It is not only more logical and native but also will help us to mock our API call. The file will be looking like that:
import axios from 'axios';

export const API = 'https://api.adviceslip.com/advice';

export const fetchData = async () => {
 return await axios.get(API).then((res) => res.data.slip);
};
👀 Let's Mock our API Call
After that, we can start mocking it. We won’t use any special libraries for mocking API calls although there are claims that it’s simpler to use libraries than write it by yourself, we are going to deal with it using those resources that we already have, exactly Jest can handle it:
import mockAxios from 'axios';

import {fetchData} from '../src/utils/fetch-data';

jest.mock('axios');

it('fetches advice from API', async () => {
 // setup
 mockAxios.get.mockImplementation(() =>
   Promise.resolve({
     data: {
       slip: {
         id: 123,
         advice: "Don't feed Mogwais after midnight.",
       },
     },
   }),
 );

 // work
 const advice = await fetchData();

 // expect
 expect(advice).toEqual({
   id: 123,
   advice: "Don't feed Mogwais after midnight.",
 });
 expect(mockAxios.get).toHaveBeenCalledTimes(1);
});
Hereupon, we ran the React Native unit test and it passed, so we need to check out our coverage and it is 94.12%.
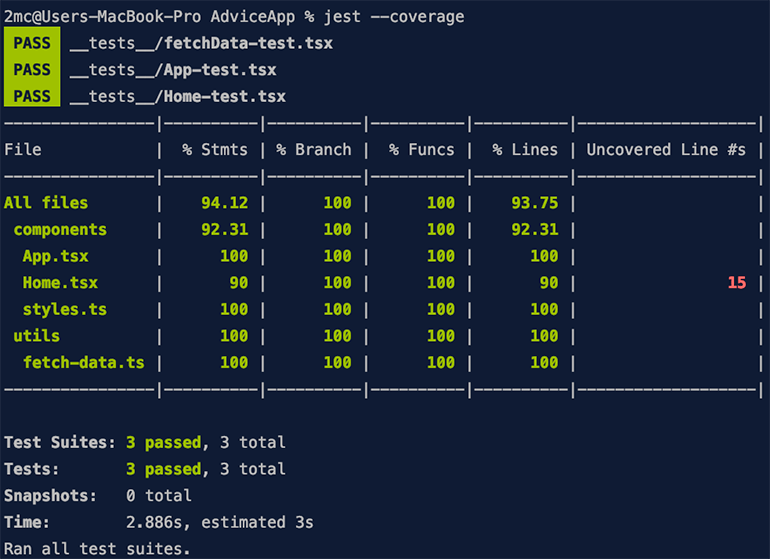
As you can see, strong efforts to cover the app by test and even connection to different libraries didn't give us 100% coverage. But we are not getting upset and suggest you help us deal with that remaining 5,88% of code coverage. Welcome to the comment section below with your ideas and offers!
🏆 Testing React-Navigation
Even though our app is very simple, small and consists only of one screen I decided to add react-navigation and show you how you can test it, too. You need to follow the instructions and add a special set up for testing navigation. Create a file `jest.config.js` and add the following code to it:
module.exports = {
 preset: 'react-native',
 setupFiles: ['./node_modules/react-native-gesture-handler/jestSetup.js'],
 transformIgnorePatterns: [
   'node_modules/(?!(jest-)?react-native|@react-native-community|@react-navigation)',
 ],
};
It has to be done for mock native modules in react-native-gesture-handler which is a part of navigation and they cannot be tested in the usual way. So it remains only to update App-test.tsx:
import React from 'react';
import {render} from 'react-native-testing-library';

import AppNavigator from '../src/components/App';

// Silence the warning https://github.com/facebook/react-native/issues/11094#issuecomment-263240420
jest.mock('react-native/Libraries/Animated/src/NativeAnimatedHelper');

describe('Testing react navigation', () => {
 test('page render Home component', () => {
   const {getByText} = render(<AppNavigator />);

   const header = getByText('Home');

   expect(header).toBeTruthy();
 });
});
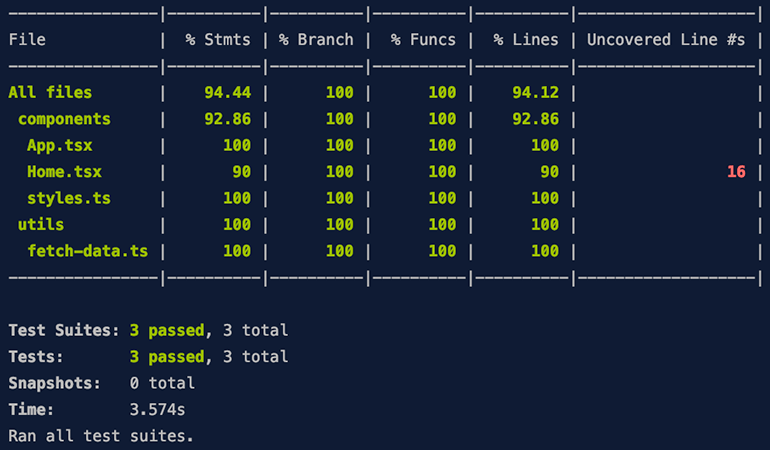
After that, we ran a test one more time. It was successfully passed and checked by the coverage. Although, it is pretty much the same but this time we deal with react-navigation too!
📄 Conclusion
Instead of retelling for the thousandth time, the benefits of React Native testing I expect you to imagine a real-life situation. Your application is expanding in functionality and becomes really complex so more and more devs start working on it. And I’m sure that diving deep into the large app can take some time, sometimes even more than expected. And since you know the ins and outs of your app, the other devs will always ask you about some parts of it, disturbing you from the work. How can we avoid that annoying diverting? 😁 Of course, you know! By starting writing React Native mobile app tests! Start it right now - save your time in future. And if you feel like you might need more training, consider taking React courses to boost your knowledge
In case you still have any questions, do not hesitate to contact our team and we will assist you in any inquiry.


